rev 3/22/20
This page contains my enhanced instructions for selecting and changing combinations for Master Lock Speed Dial locks, which are the only locks I trust, although they're not perfect and it's a good idea to have spares on hand in case your primary develops a problem. Fortunately, they're not expensive. I recommend becoming familiar with these procedures and using them whenever you think that a lock's combination has been compromised, such as after having been sent over the internet.
=============================
WARNING
If the Speed Dial lock is just "clicked" closed, it might not actually be locked, and it could be opened by just pulling on the shackle with moderate force. So, to lock it, close it firmly, and then try to pull it open to ensure that it is actually locked.
=============================
I. Selecting new combinations
Because the combinations for the Speed Dial lock can supposedly be any length, and they have to be entered in their entirety each time, nobody in their right mind would try to crack the combination, other than perhaps to try all 1,2, and 3-digit combinations. (Even four-digit multi-dial re-settable combination locks can be cracked fairly easily because you try a bunch of combinations very quickly by twirling the last digit while pulling on the shackle. Then you would add 1 to the upper three digits and twirl the last digit again, so it takes just a couple of hours at most to find the combination.) So, if you make your combinations at least 4 digits long, chances are that nobody will crack them. However, I use longer combinations. It helps to think of the lock as a toy, and changing combinations as a game. But when you lose, the lock is useless as a lock, so it's a good idea to make a video recording of the new combination being programmed into the lock (details below) and to have extra locks on hand.
A) Using phone numbers as combinations
One approach to coming up with combinations and remembering them is to use a phone number or a combination of phone numbers (such as the first three digits of one, and the last four of another) which you will remember or be able to find when you want to open the lock. But if you use this system, don't let anyone know that you're using it. The correspondence between the phone-number digits and lock-"digits" would be as follows:
0-1: Up (12:00)
2-3: Right (3:00)
4-6: Down (6:00)
7-9: Left (9:00)
Note that the phone-number digits are grouped in two groups of two, followed by two groups of three, and that the last number in each of the groups corresponds to the clock-position of the lock-"digit" (well, not exactly - 1 corresponds only to the first digit in 12). This system should be easy to remember. It will skew combinations toward D's and L's because there are more numbers associated with them than U and R in the above table, but it's not as if it's going to make it easy to crack them.
> Using a whiteboard as an aid for entering combinations
You can't be too careful when entering a combination, and writing the combination in its most direct form helps to avoid mistakes. It also helps me to avoid mistakes by saying "up" for U, "down" for D, "left" for L, or "right" for R when entering a combination.
When changing a lock's combination to one based on a phone number, or opening a lock with such a combination, I suggest writing the phone number on a whiteboard, converting it in your head to the corresponding combination, writing it below the phone number, and then double-checking the conversion.
When done changing the combination or opening the lock, erase the whiteboard.
> Make a video recording of the new combination being programmed into the lock
When entering a combination into a Speed Dial lock, my thumb sometimes seems to have a mind of its own. For example, when I intend to enter a "D" (i.e. move the lock's "knob" downward from its center/rest-position), even if I'm looking at a "D" and saying "down" to myself, my thumb sometimes moves up, left, or right. This isn't much of a problem unless I happen to be programming a new combination into the lock at the time. So, it's a good idea to make a video recording (using a camera which has no wireless capability) of the new combination being programmed into the lock, so that if you make a mistake, you can watch the recording to get the combination which was actually entered. To do this, I place the camera on the edge of a counter and hold the lock in front of it. Make a test recording and watch it to be sure you'll have a clear recording if you need it. Once the recording has served its purpose, it should be completely deleted (not just sent to the trash) to prevent anyone else from using it to obtain the combination.
B) Another system for selecting combinations
I use the GRC Ultra High Security Password Generator (an on-line random number generator) as a source of long strings of random hexadecimal numbers, and a hexadecimal-to-base-4 converter found at translatorscafe.com/cafe/EN/units-converter/numbers/4-7/hexadecimal-base-4/ to convert them to base-4 numbers. Then convert the base-4 string to U's, D's, L's, and R's using a text-editor's search/replace function (just don't use the same letter for more than one number), and then select sections from the resulting long string to use as combinations.
Never store a combination on a non-secure PC, unless it is disguised as something else. (For a relatively cheap secure PC, I recommend using a cheap mini-PC with any wireless capability removed, running an encrypted installation of Ubuntu Mate or some other variety of Ubuntu on something like a physically small 64GB flash drive, because flash drives with smaller capacities are too slow for some types of Ubuntu. When someone might be able to steal the installation, you could unplug it and hide it somewhere. They wouldn't be able to access it, but replacing such an installation would be a pain, although you could use a live installation as a secure installation in a pinch, although it's not convenient to use a live installation over the long term because such installations (except for so-called "persistent" live installations, which aren't secure and which no reliable USB-installer programs could create, the last time I checked) don't retain any settings or data when they're shut down. (I suggest having a spare encrypted USB3 installation on hand. If it's needed, you could connect the secure PC to the internet just for installation set-up - updating the software index, installing software listed in a list which you would keep for such occasions, and settings could be added to it as the need arises.) Store data on separate flash drives encrypted with the Linux LUKS format, created by using the Disks utility included with most varieties of Ubuntu, and keep multiple back-ups. Details on creating and using secure flash-drive installations and encrypted flash drives for data storage can be found the internet. Keep in mind that Big Brother, which is the black op that actually runs the world's governments and includes spiritual beings with various shades of gray and with various agendas beyond human comprehension, might have a top-secret backdoor into any encryption. Anyone who might expose such a backdoor would be warned that attempting to do so would be futile and fatal. So, you should also use physical security, of which "nonexistence" is the most secure method.) I suggest keeping a couple of printed copies in safe places, and copies on several encrypted flash drives.
II. Procedure for changing Master Lock Speed Dial lock combination
The reason I use the Master Lock Speed Dial lock is that it's the only one I trust because it can't be cracked or picked. Some of them are flaky, and don't always open on the first try even if you enter the right combination. I've had a couple which failed the first time I entered a new combination, so that they couldn't be opened even with the right combination (and I was certain that I was using the combinations which I had programmed into them). SO, AFTER ENTERING A NEW COMBINATION, ALWAYS TRY TO OPEN THE LOCK BEFORE USING IT TO LOCK ANYTHING. It seems that some combinations, at least in the case of 9-"digit" combinations, don't work very well, so when I find a combination that doesn't work well, I change it. In some cases, it might help to hold it in a vertical orientation when opening it, although that's not based on a scientific experiment and could just have been a coincidence. So, when using these locks, the top priority is to be certain that you'll be able to open them after using them to lock something, and the next priority is to be certain that nobody else will be able to open them.
The procedure for changing the combination is as follows:
A) Open the lock as usual.
B) Push the lever on the back of the lock to its upper position. (I use a large nail for this. Be careful to avoid jabbing yourself if you slip. It might be a good idea to wear a leather glove in case you do slip.)
C) Close the lock and press down firmly on the shackle twice to clear the existing combination.
D) Pull the lock open
E) (Before performing this step, read "> Record new combination being programmed into lock" above.) Very carefully enter the new combination. (It might be a good idea to start out with a one-digit combination, and then a two-digit combination, in case you make a mistake and need to open the lock without knowing the combination.) I find that saying "down" for D, "up" for U, "left" for L, and "right" for R as I enter the corresponding digit helps me to avoid making mistakes. If you think you make a mistake, return to step C.
You can correct a mistake until you push the lever on the back of the lock down and close the lock. If you make a mistake, and then push the lever down and close the lock, the lock is useless as a lock, unless you made a video recording of the new combination being programmed into the lock, as recommended above. At least they're not expensive to replace, but if you lock yourself out, you need an SD lock right away, and you don't have a spare, you're out of luck.
F) If you are reasonably certain that you entered the new combination correctly, push the lever on back to its lower position (again, be careful to avoid jabbing yourself), and close the lock firmly.
G) Try to pull the lock open to see if it's really locked. If it opens, close it more firmly and repeat this step.
H) TEST THE NEW COMBINATION BEFORE USING THE LOCK TO LOCK ANYTHING.
I) Don't leave the lock unlocked when unattended, because someone might change the combination.
J) To ensure that two people must be present when the lock is unlocked, each person would program a portion of the combination into the lock without the other person being able to watch. (So, each person would have to enter at least 4 "digits" so that the other person couldn't guess their portion of the combination.) The aforementioned video-recording system could be used in case someone makes a mistake while programming their portion into the lock. If a mistake is made, the recording could be viewed by either person so that the lock could be opened and the process could be repeated. If both people correctly program their portion into the lock, as proven by their combined ability to unlock the lock, the video would not be viewed, and it would be completely deleted (i.e. shift-deleted or sent to the trash, and the trash emptied, or overwritten by a secure-erase program) while both people observe.
Saturday, March 21, 2020
Friday, March 20, 2020
A hedge-trimmer weed-eater


rev 3/21/20
================
DANGER
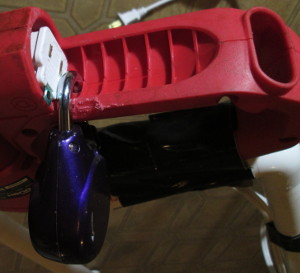
This design hasn't been professionally vetted for safety, so use it at your own risk, use a lot of common sense when using it. To prevent children from being able to plug it in, you could cut the prongs off an AC adapter, plug it in, and then insert a lock such as a Master Lock Speed Dial lock through the trimmer as shown in a couple of the photos. For details on using Speed Dial locks, see the relevant posting in this blog. Simply inserting the lock without the modified adapter isn't sufficient to stop a determined child, and the prongs must be cut off to prevent them from attaching a cord despite the presence of the lock, and creating a dangerous situation. To cut the prongs off an adapter, I held the adapter with a pair of slip-joint pliers and cut the prongs with a hacksaw, and wore leather work gloves to avoid cutting my hand if I slipped. I drilled a 5/16" hole in the center for the lock as can be seen in the relevant photos, but had to file the side as can be seen in one photo to get the lock to go through the hole. So, I suggest drilling the hole slightly off-center in the direction of the side that I filed.
==========
Some weeds started growing slowly at my place in Arizona during the winter, and I figured that I'd get them with my normal weed-eater when the weather improved. But before that happened, the weeds grew like mad due to the amount of rain this year and perhaps the CO2 levels in the atmosphere, and quickly became too much for my normal weed eater. So, I came up with a way to use a cheap hedge trimmer available at Wal-mart as a weed eater, as can be seen in the photos. It worked out very well, although it's quite loud and I highly recommend using ear protection or plugs when using it.
The extension-handle consists of 3/4" PVC tubing and fittings. It which uses a tee with a couple of stubby lateral pieces to attach to the front handle of the hedge trimmer, and an elbow and a 4" piece of tubing to attach to the rear handle. The front upright is 20" long, and the rear is 19.5" long. (I'm about 6' tall, and you might want to adjust these lengths to suit your height.) The horizontal piece is 9.25" long, but it could be a little longer as can be seen in the photo. The handle extending in front of the front upright consists of a couple of 4" pieces, a couple of elbows, and a stubby piece to connect to the tee. If you're left-handed, the handle would extend to the right instead of the left, or a tee could be substituted for the elbow to allow a handle to extend in each direction. The tee on the bottom-front is connected to the hedge trimmer's front handle with a couple of long zip-ties (which might not be necessary) crisscrossed as can be seen in one of the photos, and Gorilla tape. (Each zip tie consists of two 8" zip ties linked together to obtain sufficient length. Don't tighten either until both are in place, and then tighten them alternately a little at a time to get the alignment right.) The switch is taped so that it remains on, and then the extension handle is taped to the hedge trimmer's rear handle.
To assemble the extension handle, first glue the fittings on the top of the vertical pieces, and then glue-in the top horizontal piece, and lay it on a flat surface before the glue sets up to align the vertical pieces in the same plane. (Glue it outside in a breeze to avoid inhaling any of the vapors.) Glue the the 4" piece into the bottom-rear elbow, and then glue the elbow to the rear vertical piece and quickly lay the assembly on a flat surface to align the 4" piece into the same plane as the vertical pieces. Then do the same thing for the forward-protruding portion of the handle which extends in front of the vertical piece, and then glue on the rest of the handle and align it by eye. Next, glue the tee to the bottom of the front vertical piece, and align it by eye.
The in-line switch that can be seen in one of the photos is known as a tap-switch. The small extension cord is connected to the hedge trimmer with a common adapter-plug, as can be seen in the photos. The long extension cord is attached by means of some small zip ties and a small "carbiner" available at Wal-mart, as shown in the photos.
One nice aspect of this thing is that it doesn't spew sticky bits of plant matter in all directions and get a thick gooey build-up on it. After hacking weeds for a few hours, there was essentially nothing stuck to it, and my pants and shoes weren't spattered with sticky bits of plant matter.
Subscribe to:
Comments (Atom)