


rev 3/21/20
================
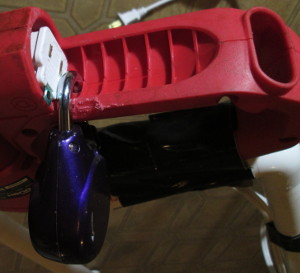
DANGER
This design hasn't been professionally vetted for safety, so use it at your own risk, use a lot of common sense when using it. To prevent children from being able to plug it in, you could cut the prongs off an AC adapter, plug it in, and then insert a lock such as a Master Lock Speed Dial lock through the trimmer as shown in a couple of the photos. For details on using Speed Dial locks, see the relevant posting in this blog. Simply inserting the lock without the modified adapter isn't sufficient to stop a determined child, and the prongs must be cut off to prevent them from attaching a cord despite the presence of the lock, and creating a dangerous situation. To cut the prongs off an adapter, I held the adapter with a pair of slip-joint pliers and cut the prongs with a hacksaw, and wore leather work gloves to avoid cutting my hand if I slipped. I drilled a 5/16" hole in the center for the lock as can be seen in the relevant photos, but had to file the side as can be seen in one photo to get the lock to go through the hole. So, I suggest drilling the hole slightly off-center in the direction of the side that I filed.
==========
Some weeds started growing slowly at my place in Arizona during the winter, and I figured that I'd get them with my normal weed-eater when the weather improved. But before that happened, the weeds grew like mad due to the amount of rain this year and perhaps the CO2 levels in the atmosphere, and quickly became too much for my normal weed eater. So, I came up with a way to use a cheap hedge trimmer available at Wal-mart as a weed eater, as can be seen in the photos. It worked out very well, although it's quite loud and I highly recommend using ear protection or plugs when using it.
The extension-handle consists of 3/4" PVC tubing and fittings. It which uses a tee with a couple of stubby lateral pieces to attach to the front handle of the hedge trimmer, and an elbow and a 4" piece of tubing to attach to the rear handle. The front upright is 20" long, and the rear is 19.5" long. (I'm about 6' tall, and you might want to adjust these lengths to suit your height.) The horizontal piece is 9.25" long, but it could be a little longer as can be seen in the photo. The handle extending in front of the front upright consists of a couple of 4" pieces, a couple of elbows, and a stubby piece to connect to the tee. If you're left-handed, the handle would extend to the right instead of the left, or a tee could be substituted for the elbow to allow a handle to extend in each direction. The tee on the bottom-front is connected to the hedge trimmer's front handle with a couple of long zip-ties (which might not be necessary) crisscrossed as can be seen in one of the photos, and Gorilla tape. (Each zip tie consists of two 8" zip ties linked together to obtain sufficient length. Don't tighten either until both are in place, and then tighten them alternately a little at a time to get the alignment right.) The switch is taped so that it remains on, and then the extension handle is taped to the hedge trimmer's rear handle.
To assemble the extension handle, first glue the fittings on the top of the vertical pieces, and then glue-in the top horizontal piece, and lay it on a flat surface before the glue sets up to align the vertical pieces in the same plane. (Glue it outside in a breeze to avoid inhaling any of the vapors.) Glue the the 4" piece into the bottom-rear elbow, and then glue the elbow to the rear vertical piece and quickly lay the assembly on a flat surface to align the 4" piece into the same plane as the vertical pieces. Then do the same thing for the forward-protruding portion of the handle which extends in front of the vertical piece, and then glue on the rest of the handle and align it by eye. Next, glue the tee to the bottom of the front vertical piece, and align it by eye.
The in-line switch that can be seen in one of the photos is known as a tap-switch. The small extension cord is connected to the hedge trimmer with a common adapter-plug, as can be seen in the photos. The long extension cord is attached by means of some small zip ties and a small "carbiner" available at Wal-mart, as shown in the photos.
One nice aspect of this thing is that it doesn't spew sticky bits of plant matter in all directions and get a thick gooey build-up on it. After hacking weeds for a few hours, there was essentially nothing stuck to it, and my pants and shoes weren't spattered with sticky bits of plant matter.
No comments:
Post a Comment
Note: Only a member of this blog may post a comment.